
My Sticker Making Process
Hey friend!! When I first opened up my shop, I began by selling stickers that I made at home. Now almost a whole year later, I have done my share of sticker making and I would like to share my process in case you too would like to make your own stickers at home too!
Most of the supplies, materials and equipment can be found here on my Amazon Store Front!
NOTE: Some of the links included in this description might be affiliate links to products I have purchased or recommend. Which means I may earn a small commission if you choose to use my link to buy a product. There is no additional cost for you. I appreciate your support!
Step 1: Design
Step 1: Design
With over 100 stickers in my shop, you may be wondering, with that many designs how do you come up with ideas? Well, I usually start off with an idea for a theme or collection. I start broad and general so for example, lets say I want to make some stickers that are birthday themed. I take that idea and I make a list of activities or ideas related to birthdays such as birthday hats, balloons, cakes, candles, etc. From this list, I’ll take inspiration for sketches and see which ideas I would like for designs.
With some sketches done, I will go on to my iPad, and use Procreate to draw out my designs. I almost always use a square canvas that is 3080 pixels wide x 3080 pixels tall at 300 dpi.

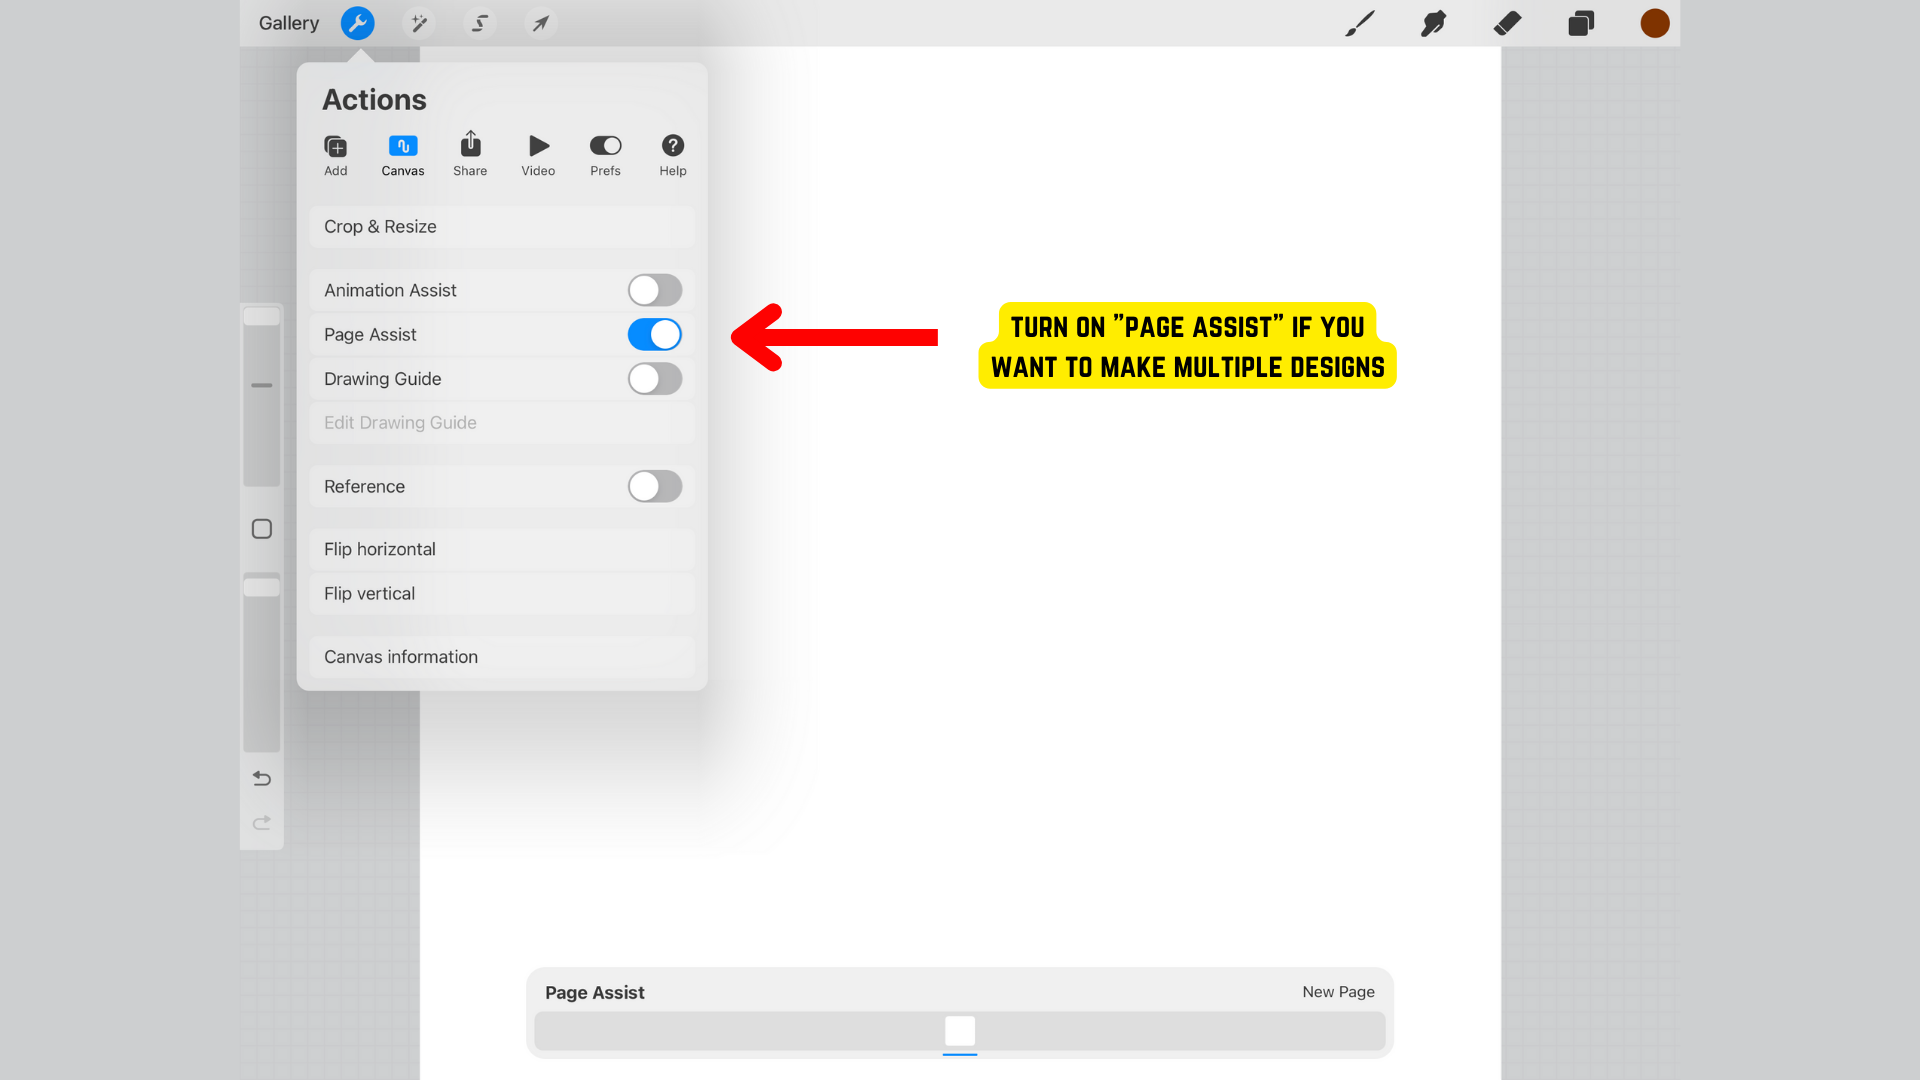
When I have multiple designs that I want to create, I will also turn on page assist so that I can create all my designs on the same canvas. This is simply a choice of preference. I do this because I can export all my designs at the the same time to make things quicker for me.
The last thing I do before I start is turn off the background.

Now with all the settings done, I can work on completing the designs. This is when I do all the line work and coloring. If the design has text, sometimes, I will use canva for that because its easier to manipulate the text for me there. Once I am done with a design, I will draw the sticker outline. There are multiple ways of doing this but my preferred method is to draw it out myself.

Once the sticker is done and it has an outline, I will airdrop it to my macbook as a PNG file so that the background will stay transparent.

Step 2: Digital Setup
Step 2: Digital Setup
Once my design files have been transferred, I’ll open the Cricut Design Space and open a new canvas by clicking on the 3 lines in the top left corner and clicking “Canvas.” A brand new canvas should appear and the first thing I always do is create a square shape and change the dimensions to 6.75 x 9.25. This square will act as a workable area guide since the Cricut will not accept anything thats outside these dimensions.

Now, we can import our designs by clicking “Upload”. A new screen will appear and here I’ll click “Upload Image”.

You can either drag&drop or browse for your files.

Here I select “complex” because I feel that this option helps retain the quality of the design. Then, we can click “Continue”.

Here is where you can remove the background if you have one but since we turned off the background in procreate and have uploaded a PNG with a transparent background we don’t have to do anything and can just click Apply & Continue.

On this page, we will select Print then Cut since we want the design to be printed and cut. Finally click upload.

I will repeat this process with all of my designs and once they’re all uploaded, I can select them all and add them to my canvas at the same time.

The designs usually show up very large so I’ll make sure all are selected and size them down at the same time to make them more workable. Next, we have to rearrange and resize the designs to fit within the square guide. I usually try to move them around to maximize space. My goal in this stage is fit as many stickers as possible. Once I feel like nothing else can fit, I will delete the square guide. Then, select all the designs and click “Attach.” This will keep the layout that you have and not rearrange the designs when it comes to printing.

We can now click on “Make it” in the top right and you’ll get a little preview of what everything will look like. Nothing should change so we can just click continue.


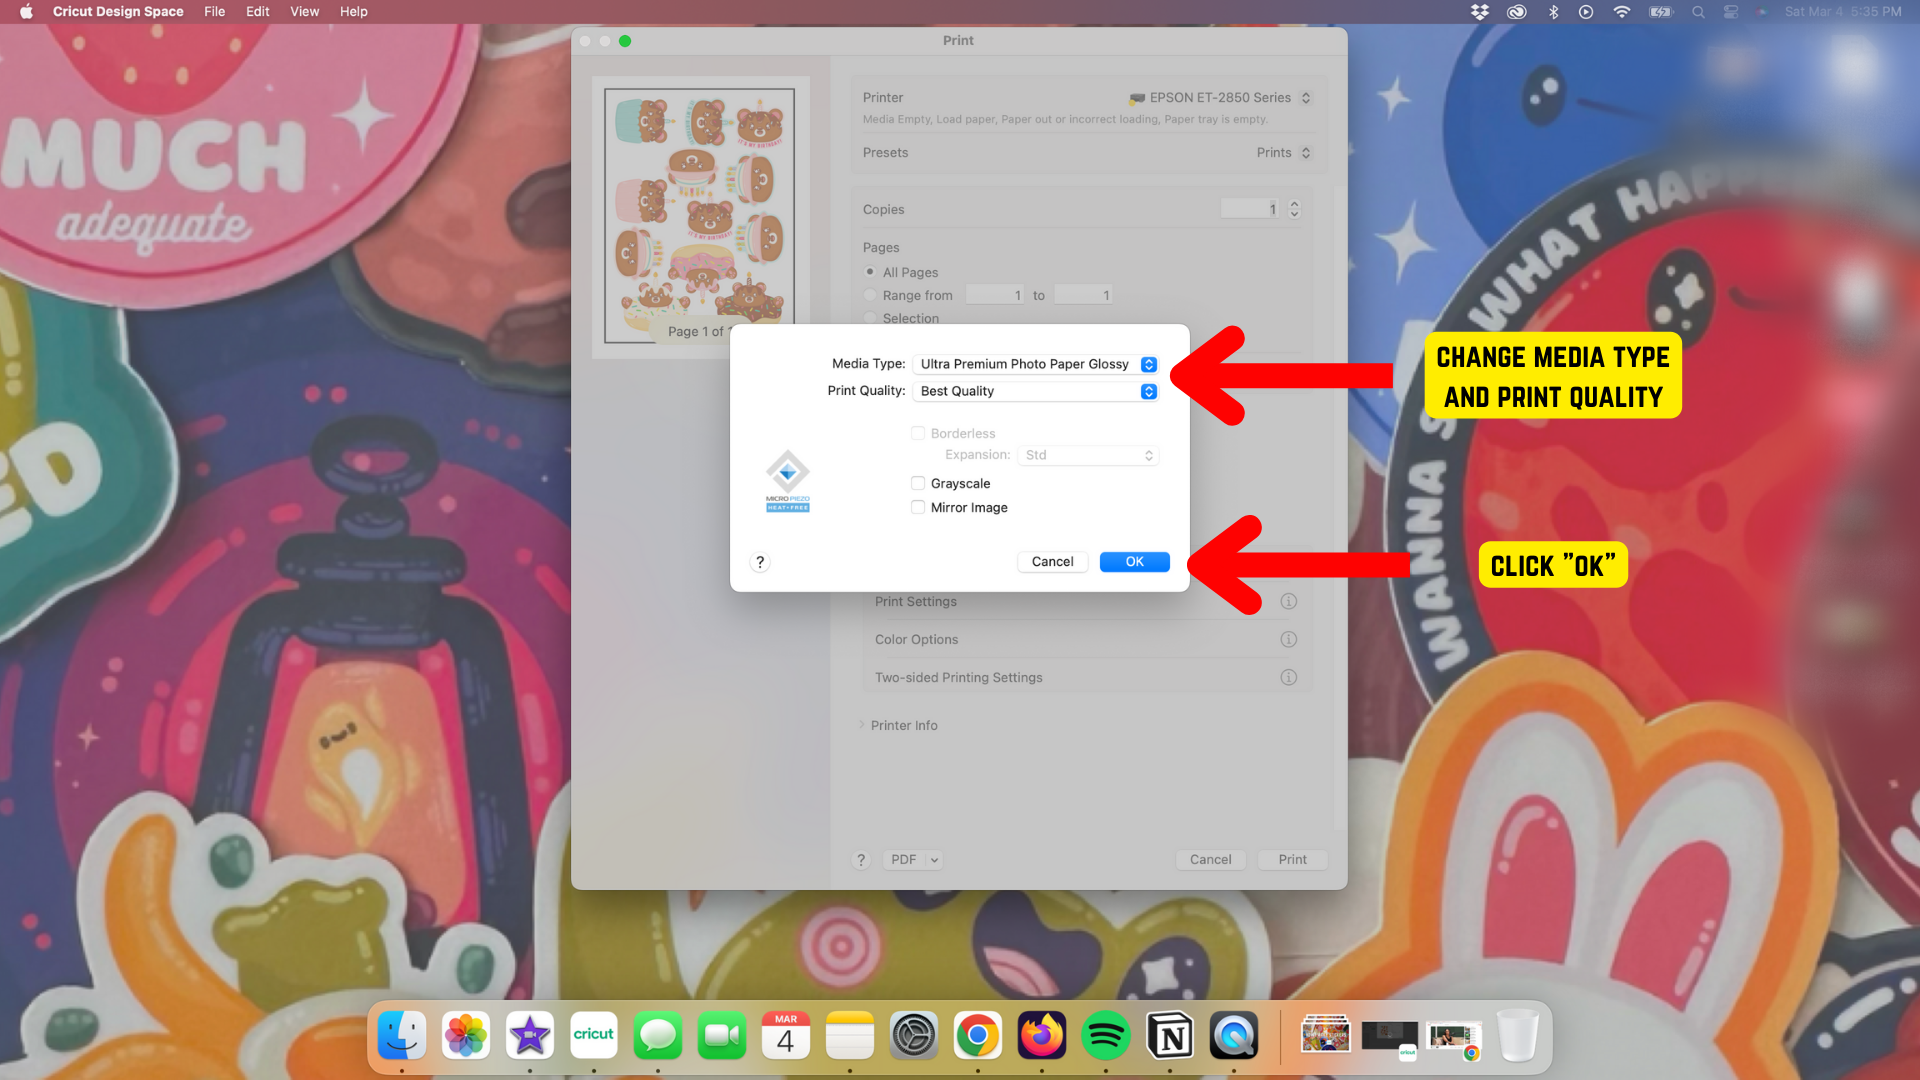
And now we come to the print and cut setting screen. The first thing we’re going to do is click send to printer.

On this pop-up, I will turn off “Add Bleed” because its usually a hit or miss for me with this setting and turn on “Use Systems Dialogue” because I want to pick the printing settings and not use the default ones. And then click Print.

The cricut design space will then want to play a little game of hide and seek so you’ll have to minimize the window to find your systems dialogue window to adjust the printer settings.
If this is your first time printing art, this part is probably going to be the most annoying part or at least it was for me so hopefully I can be helpful enough to ease this step. I have the EPSON eco-tank 2850. and I use Online labels sticker paper. I will show you the settings that I use that I liked best and discovered thru trial and error.
Under Printer Options, I start with Print settings and change the media type to premium photo paper glossy and change the print quality to best quality.

The last thing I change before printing is still under printer options but under color options. Here I will make sure manual settings is selected and go to the advanced settings and adjust the contrast and the colors to 10. I found these settings by doing many test prints so I would advice to start here and make adjustments as needed to fit your personal preference.


Now before pressing print, you want to load your paper into your printer. On the EPSON, whenever I load paper, I am prompted to select the paper size which will be letter and Paper Type which will be Prem. Matte.
You may be asking why choose glossy paper as the media type on my computer if I’m using matte paper. Well sometimes with some colors, there would be weird yellowing on the white parts of the sticker. I have found that doing this trick has prevented that from ever happening again but I would suggest testing out different settings for yourself if you’re having issues.
At this point, we are ready to print our designs. So press print. And on the EPSON, I get a warning telling me that there is mismatch for paper type and I just click to continue and the printing will begin. The EPSON is great with printing and is efficient with ink but the printing usually take takes a few minutes so while that is happen I will go back to the cricut design space and select my cut settings. For stickers, I use the Heavy Cardstock cut settings. You can find this option by clicking on browse material and find it on the list or by typing it into the search bar. You can bookmark these options which I recommend so you don’t have to search every time. I also set the pressure to more to be sure that the blade with cut through the laminating sheets and sticker paper.

Step 3: PHYSICAL SETUP
Step 3: PHYSICAL SETUP
Once the settings have been adjusted and the printing is done, we can move on to cutting. We will place the printed sticker sheet onto the mat, making sure to align it with the top left corner. I will take my squeegee and run over the sheet to help secure it to the mat.

Next, I will take my laminating sheet and cut it down to size to fit within the black registration lines. If I go over them, the cricut might have a hard time reading them and miscut the designs or not cut them at all.

The technique I use to laminate is to peel off the tab at the top of these sheets and line it up to the top designs and within the registration marks and place it down. Then I’ll fold up a small section of the backing and smooth down the small bit of the laminating sheet. Then I put my squeegee into the fold and hold it and the paper with my right hand. With my left hand holding down the mat, I will pull the laminating sheet and squeegee together across the sticker paper. And again I will take my squeegee and run it across the laminating sheet to help secure the it to the paper and remove any air bubbles.

Okay so we’re almost done and we can finally load the mat into the cricut. I make sure that the mat is properly fed into the machine and press go.
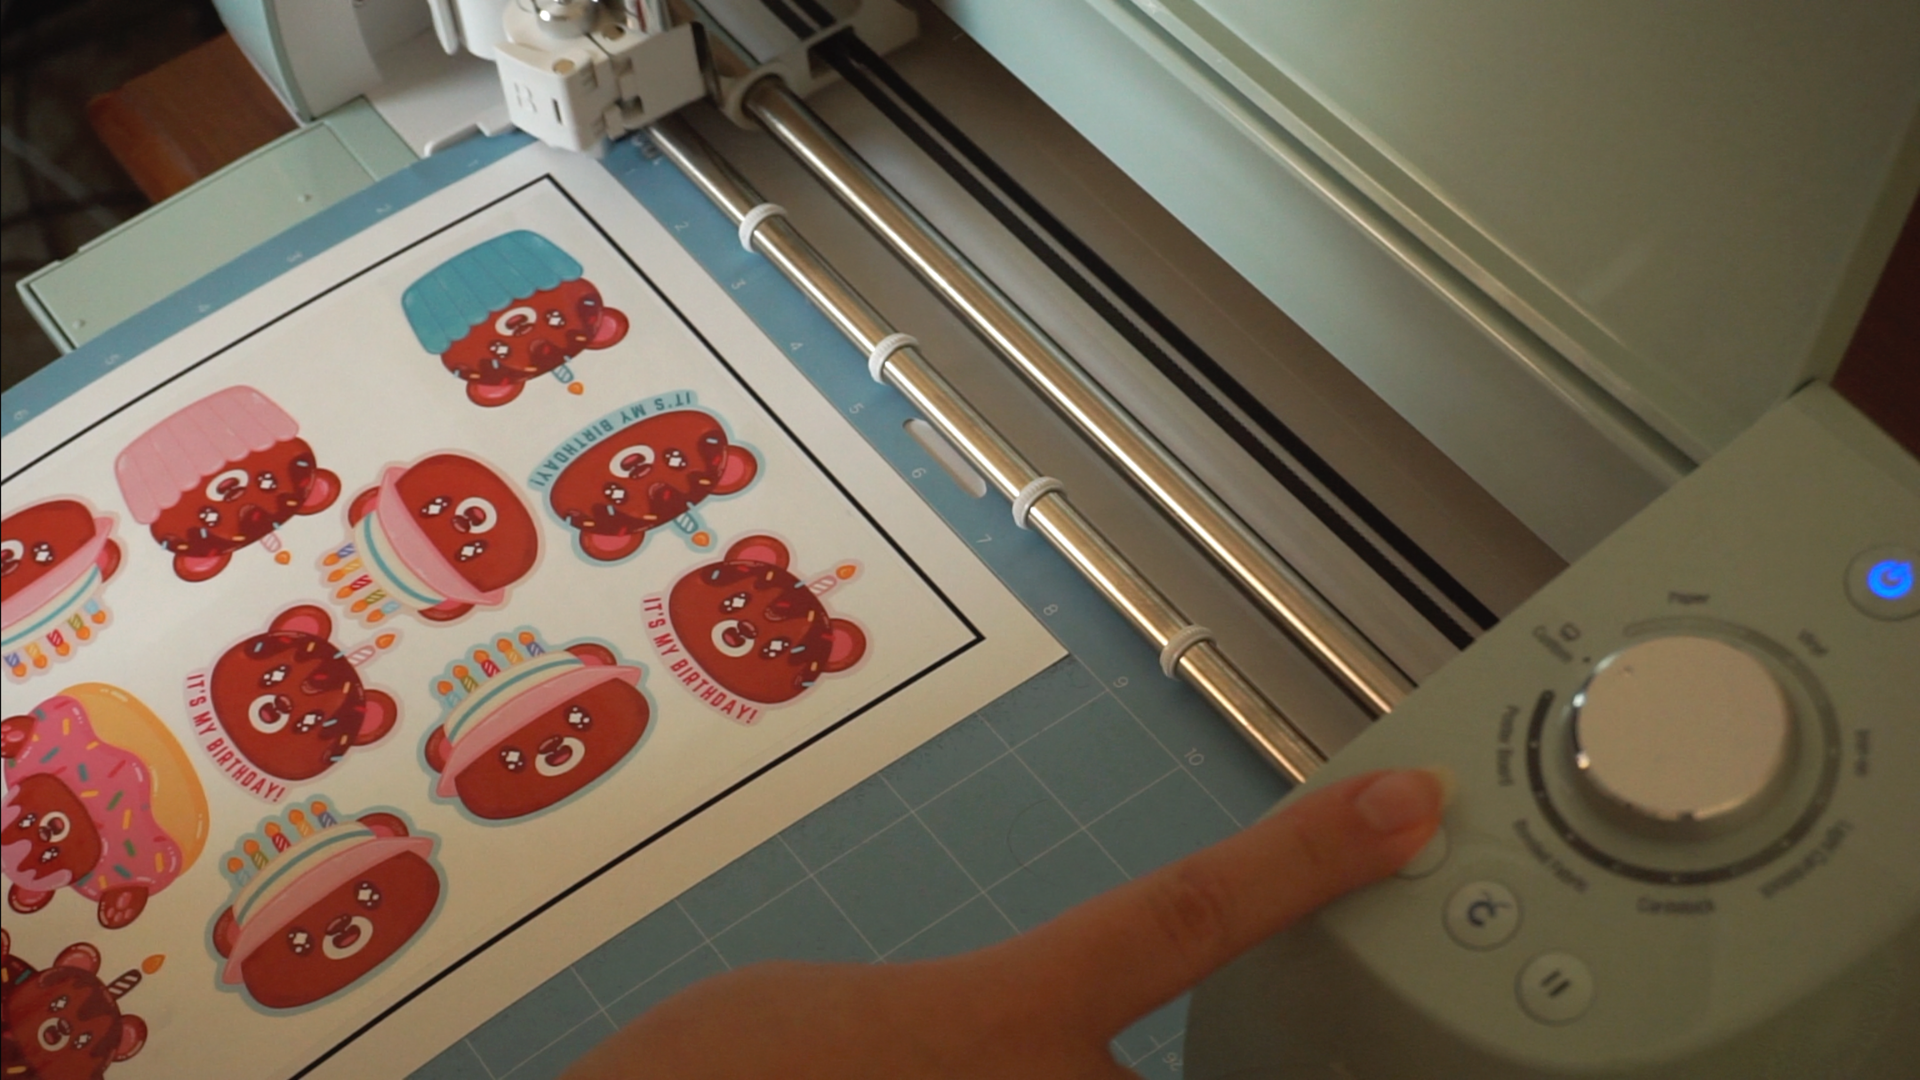
Usually a full page of stickers takes about a minute or so to cut. Once the cutting is completer, I can unload the mat and remove the excess sticker paper from around the designs first. Then I’ll remove the individual stickers by curving the mat so that the stickers pop off more easily without them curling.

At this point, I will inspect the stickers and look for any miscuts since the cricut isn’t a perfect machine. If I do notice that some stickers aren’t to my quality standards, I will calibrate the Cricut as well as update its firmware. This has usually helped with most of my issues. With any miscut stickers I do end up having I usually will collect and store them to offer at a discount price later on.

AND WE'RE DONE!
AND WE'RE DONE!
And that’s it! That’s my process for making stickers from start to finish. It may seem like a lot of steps but once you get the hang of it, it becomes a fun and easy process.